
PGP
the CryptoParty handbook - Version: 2013-08-21 - Back to Index
PGP
This chapter will introduce you to some basic concepts behind mail encryption. It is important to read to get some feeling of how mail encryption actually works and what its caveats and limitations are. PGP (Pretty Good Privacy) is the protocol we shall use for e-mail encryption. This protocol allows us to digitally sign and encrypt mail messages. It works on an end-to-end basis: messages will be encrypted on your own computer and will only be decrypted by the recipient of the message. There is no possibility for a ‘man-in-the-middle’ to decipher the contents of your encrypted message. This excludes the subject lines and the ‘from’ and ‘to’ addresses, which unfortunately are not encrypted in this protocol.
After having introduced these basic concepts, the next chapters will give you a hands-on guide to install the necessary tools on your operating system and get encryption up and running. We will focus on using Enigmail which is an extension for Thunderbird that helps you manage PGP encryption for your email. The installation process for Enigmail / PGP is different for Mac OSX, Windows and Ubuntu so please see the appropriate chapters in this section for instructions.
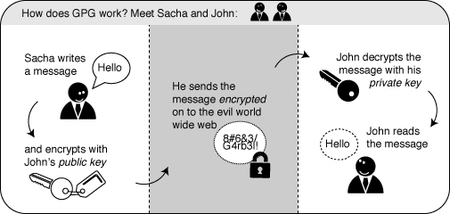
GPG Schema
A crucial concept in mail encryption is the usage of so-called key-pairs. A key-pair is just two separate files sitting on your harddisk or USB stick. Whenever you want to encrypt mails for a certain mail-account, you will need to have these files available to yourself in some form. If they are sitting at home on your computer, you will not be able to decrypt mail at the office. Putting them on a USB stick should provide a solution to this problem.
A key-pair consists of the two different keys: a public key and a secret key.
The public key: you can give this key to other people, so they can send you encrypted mails. This file does not have to be kept secret.
The secret key: this basically is your secret file to decrypt emails people send to you. It should never be given to someone else.
I have five colleagues at work and I want to send encrypted mails to them. I need to have public keys for each of their addresses. They can send me these keys using ordinary mail, or they can give them to me in person, or put them on a USB stick, or they can have their keys on a website. It doesn’t matter, as long as I can trust those keys really belong to the person I want to correspond with. My software puts the keys on my `keyring’, so my mail application knows how to send them encrypted mails.
For my five (or thirty) colleagues to be able to send me encrypted mails, the process goes the other way around. I need to distribute my public key to each of them.
All the people in a network of friends or colleagues wanting to send each other encrypted emails, need to distribute their public keys to each other, while keeping their secret keys a closely guarded secret. The software described in this chapter will help you do this key management.
To complicate matters a little - PGP is the protocol used for encrypting e-mail by various softwares. To get PGP to work with Thunderbird we need to install GPG - a free software implementation of PGP and Enigmail - an extension of Thunderbird that allows you to use GPG… Confused?! Don’t worry about it, all you have to know is how to encrypt your email with PGP and you need to install both GPG and Enigmail. Here is how to do it…
The GNU Privacy Guard (GnuPG) is software which is required to send PGP encrypted or signed emails. It is necessary to install this software before being able to do any encryption.
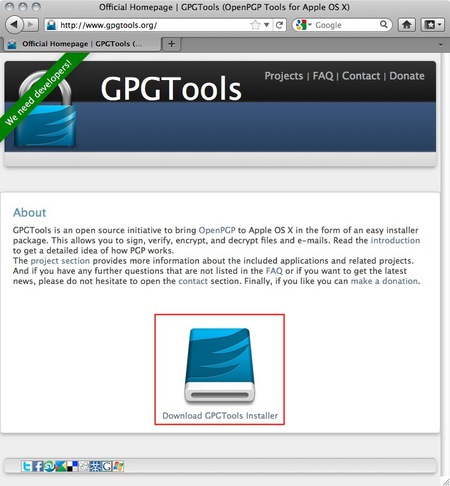
Head to the website of the Gpg4win project. Go to http://gpg4win.org/
On the left side of the website, you will find a ‘Download’ link. Click on it.

GPG Windows
This will take you to a page where you can download the Gpg4Win. Click on the button which offers you the latest stable version (not beta) of Gpg4Win.
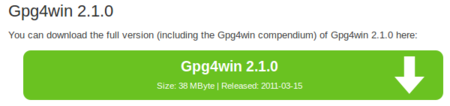
GPG Windows
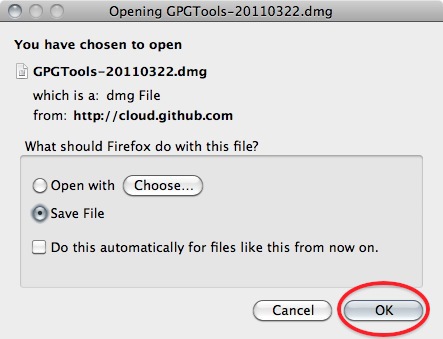
This will download you an .exe file. Depending on your browser, you may have to double-click on this downloaded file (named something like gpg4qin-2.1.0.exe) before something happens. Windows will ask you if you are sure you want to install this program. Answer yes.
Then complete the installation by agreeing to the license, choosing appropriate language and accepting the default options by clicking ‘Next’, unless you have a particular reason not to.
The installer will ask you where to put the application on your computer. The default setting should be fine but make a note of it as we may need this later. Click on ‘Next’ when you agree.
After you have successfully installed the PGP software as we described above you are now ready to install the Enigmail add-on.
Enigmail is a Thunderbird add-on that lets you protect the privacy of your email conversations. Enigmail is simply an interface that lets you use PGP encryption from within Thunderbird.
Enigmail is based on public-key cryptography. In this method, each individual must generate her/his own personal key pair. The first key is known as the private key. It is protected by a password or passphrase, guarded and never shared with anyone.
The second key is known as the public key. This key can be shared with any of your correspondents. Once you have a correspondent’s public key you can begin sending encrypted e-mails to this person. Only she will be able to decrypt and read your emails, because she is the only person who has access to the matching private key.
Similarly, if you send a copy of your own public key to your e-mail contacts and keep the matching private key secret, only you will be able to read encrypted messages from those contacts.
Enigmail also lets you attach digital signatures to your messages. The recipient of your message who has a genuine copy of your public key will be able to verify that the e-mail comes from you, and that its content was not tampered with on the way. Similarly, if you have a correspondent’s public key, you can verify the digital signatures on her messages.
To begin installing Enigmail, perform the following steps:
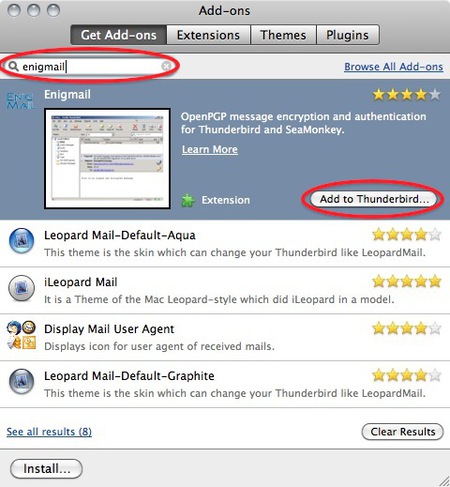
Open Thunderbird, then Select Tools > Add-ons to activate the Add-ons window; the Add-ons window will appear with the default Get Add-ons pane enabled.
Enter enigmail in the search bar, like below, and click on the search icon.
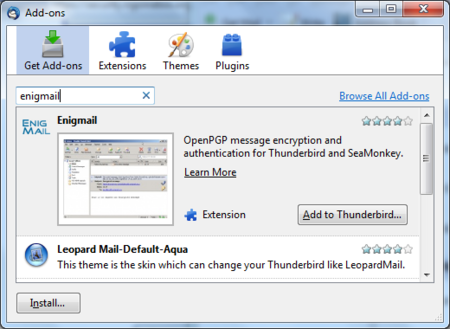
Enigmail Install
Simply click on the ‘Add to Thunderbird’ button to start the installation.
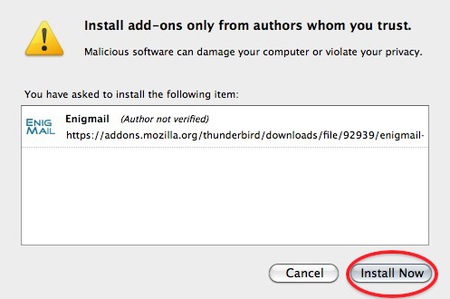
Thunderbird will ask you if you are certain you want to install this add-on. We trust this application so we should click on the ‘Install now’ button.
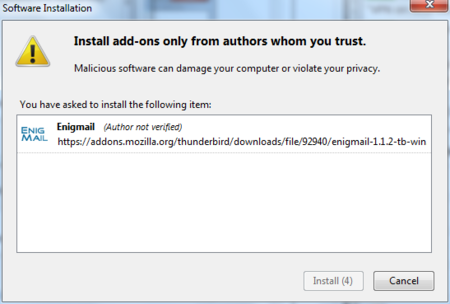
Enigmail Install

Enigmail Install
The GNU Privacy Guard (GnuPG) is software which enables you to send PGP encrypted or signed emails. It is necessary to install this software before being able to do any encryption. This chapter covers the installation steps required to install GnuPG on Mac OSX.
For this chapter we assume you have the latest version of:
Note on OSX Mail: It is possible to use PGP with the build-in mail program of OSX. But we do not recommend this because this option relies on a hack of the program which is neither open or supported by its developer and breaks with every update of the mail program. So unless you really have no other option we advice you to switch to Mozilla Thunderbird as your default mail program if you want to use PGP.
(nb. We are using the latest version Firefox for this manual, so the screens might look a little bit different if you are using a different browser)
GPG Install
GPG Install

GPG Install
GPG Install
(Note, if you’re Mac is bought before 2006 it will not have an intel processor required to run this software and the installation will fail. Sadly it is beyond the scope op this manual to also take into account computers over five year old)
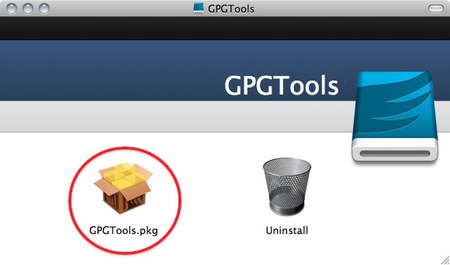
GPG Install
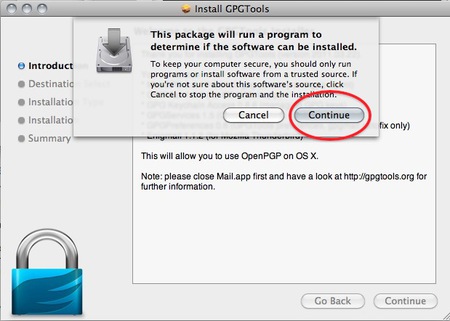
You will be guided by the program through the next steps like accepting the license agreement. But stop pressing all the OK’s and Agrees as soon as you come to the ‘Installation Type’ screen:

GPG Install
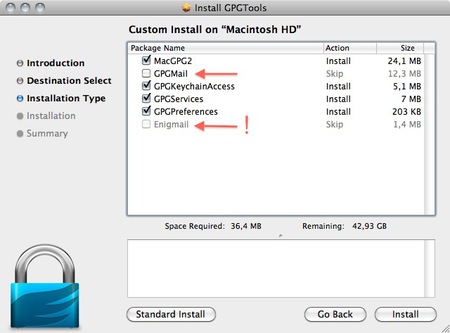
GPG Install
As said in the intro; we advise against using Apple Mail in combination with PGP. Therefore you won’t be needing ‘GPGMail’, as this enables PGP on Apple Mail, and you can uncheck it.
‘Enigmail’ on the other hand is very important as it is the component that will enable Thunderbird to use PGP. In the screen shot here it is greyed out as the installer wasn’t able to identify my installation of Thunderbird. Since this seems to be a bug. You can also install Enigmail from within Thunderbird as is explained in another chapter.
If the option is not greyed out in your installation, you should tick it.
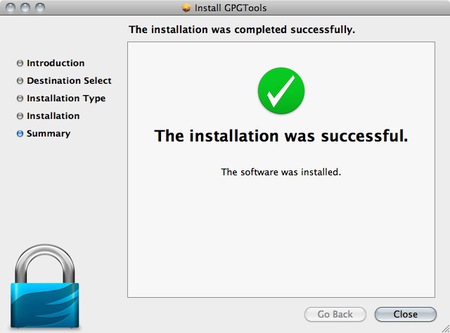
After you checked all the components you want to install click ‘Install’ to proceed. The installer will ask you for your password and after you enter that the installation will run and complete; Hooray!
GPG Install
Select Tools > Add-ons to activate the Add-ons window; the Add-ons window will appear with the default Get Add-ons pane enabled.In the Add-On window, you can search for ‘Enigmail’ and install the extension by clicking ‘Add to Thunderbird …’
GPG Install
GPG Install
Be aware that you will have to restart Thunderbird to use the functionality of this extension!
Now that you have successfully downloaded and installed Enigmail and PGP you can go on to the Chapter that deals with setting up the software for use.
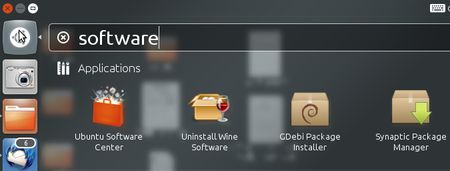
We will use the Ubuntu Software Centre for installing PGP (Enigmail and accessories). First open the Ubuntu Software Center through the Unity menu by typing ‘software’ into the Unity search area
PGP Install
Click on the ‘Ubuntu Software Center’.
Type into the search field ‘Enigmail’ and search results should be returned automatically:
Highlight the Enigmail item (it should be highlighted by default) and click ‘Install’ and you will be asked to authenticate the installation process.

PGP Install
Enter your password and click ‘Authenticate’. The installation process will begin.
When the process is completed you get very little feedback from Ubuntu. The progress bar at the top left disappears. The ‘In Progress’ text on the right also disappears. Enigmail should now be installed.
With the growing usage of mobile phones for e-mail, it’s interesting to be able to use GPG also on your mobile. This way you can still read the messages sent to you in GPG on your phone and not only on your computer.
Install the Android Privacy Guard (APG) and K-9 Mail applications to your Android device from the Google Play Store or another trusted source.
This is a small tool which makes GPG encryption possible on the phone. You can use APG to manage your private and public keys. The options in the application are quite straightforward if you are a little knowledge of GPG in general.
Management of keys is not very well implemented yet. The best way is to manually copy all your public keys to the SD card in the APG folder. Then it’s easy to import your keys. After you’ve imported your public and private keys, GPG encrypting, signing and decrypting will be available for other applications as long as these applications have integrated encryption/GPG.
The default mail application does not support GPG. Luckily there is an excellent alternative: K-9 Mail. This application is based on the original Android mail application but with some improvements. The application can use APG as it’s GPG provider. Setting up K-9 Mail is straightforward and similar to setting up mail in the Android default mail application. In the settings menu there is an option to enable “Cryptography” for GPG mail signing.
If you want to access your GPG mails on your phone this application is a must have.
Please note, due to some small bugs in K-9 Mail and/or APG, it’s very advisable to disable HTML mail and use only Plain text. HTML mails are not encrypted nicely and are often not readable.
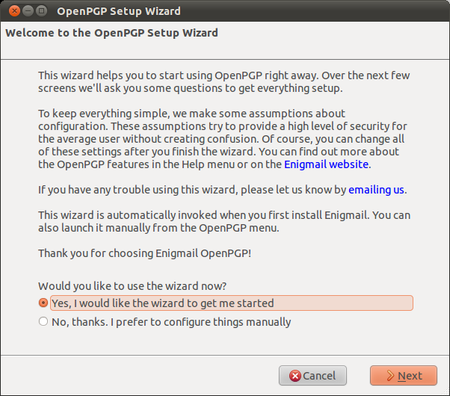
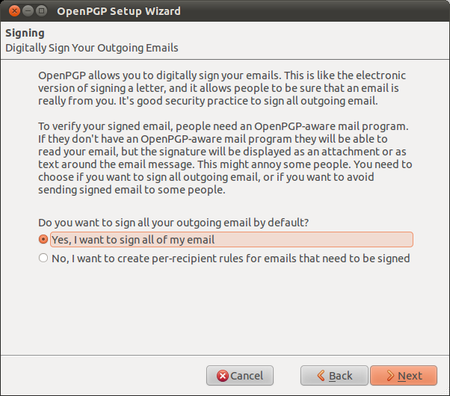
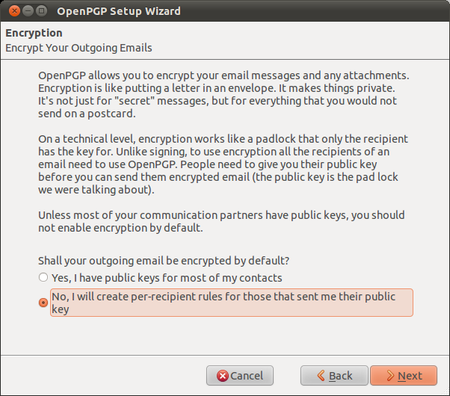
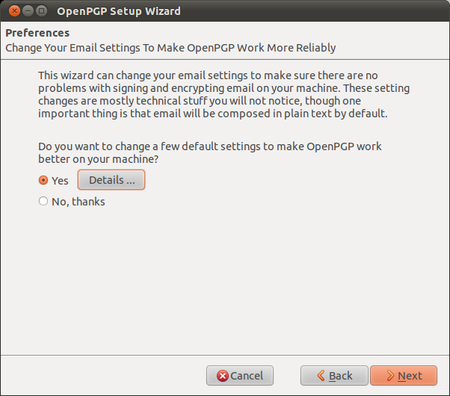
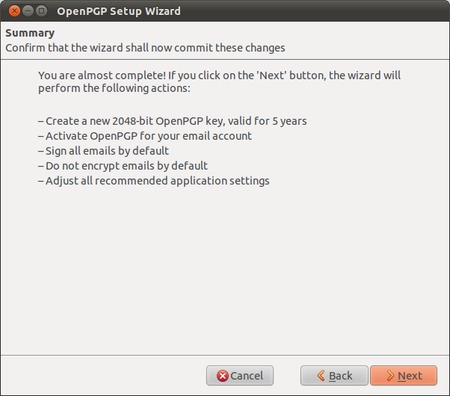
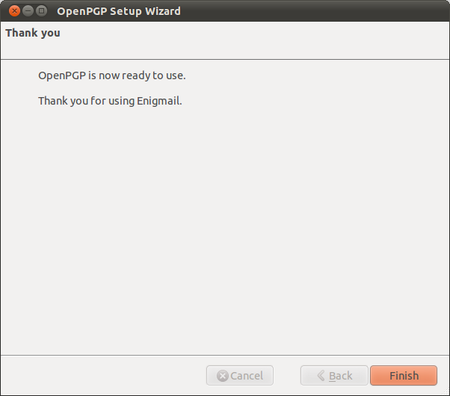
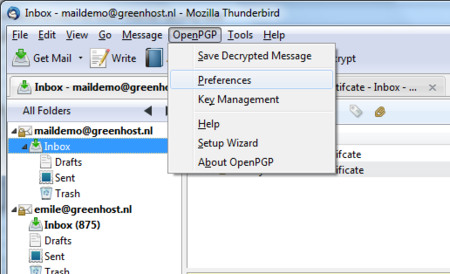
Enigmail comes with a nice wizard to help you create a public/private key pair (see the chapter introducing PGP for an explanation). You can start the wizard at any time within Thunderbird by selecting OpenPGP > Setup Wizard from the menu on top.
GPG Keys
GPG Keys
GPG Keys
GPG Keys

GPG Keys
GPG Keys

GPG Keys
GPG Keys

GPG Keys
GPG Keys
GPG Keys
Congratulations, you now have a fully PGP-configured mail client. In the next chapter we will explain how to manage your keys, sign messages and do encryption. Thunderbird can help you do a lot of these things automatically.
In the previous chapters we have have explained how to set up a secure mail environment using Thunderbird, GPG and Enigmail. We assume you have installed the software and have successfully followed the wizard instructions to generate an encryption key-pair as described in the previous chapter. This chapter will describe how to use your secured Thunderbird in daily life to protect your e-mail communication. In particular we will focus on:
First we shall explain two dialog windows that will inevitably appear after you start using Thunderbird to encrypt your emails.
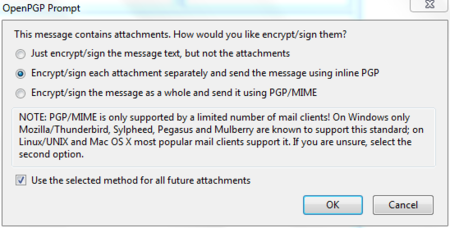
The dialog window below will pop-up whenever you are sending an encrypted email with attachments for the first time. Thunderbird asks a technical question on how to encrypt attachments to your mail. The second (default) option is the best choice, because it combines security with the highest compatibility. You should also select the ‘Use the selected method for all future attachments’ option. Then click ‘OK’ and your mail should be sent with no further delay.
Daily GPG Usage
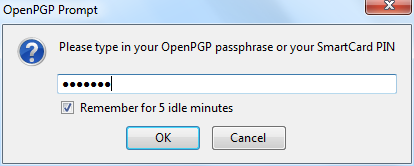
For security reasons, the pass-phrase to your secret key is stored temporarily in memory. Every now and then the dialog window below will pop-up. Thunderbird asks you for the pass-phrase to your secret key. This should be different from your normal email password. It was the pass-phrase you have entered when creating your key-pair in the previous chapter. Enter the pass-phrase in the text-box and click on ‘OK’
Daily GPG Usage
The decryption of e-mails is handled automatically by Enigmail, the only action that may be needed on your behalf is to enter the pass-phrase to your secret key. However, in order to have any kind of encrypted correspondence with somebody, you will first need to exchange public keys.
There are multiple ways to distribute your public key to friends or colleagues. By far the simplest way is to attach the key to a mail. In order for your friend to be able to trust that the message actually came from you, you should inform them in person (if possible) and also require them to reply to your mail. This should at least prevent easy forgeries. You have to decide for yourself what level of validation is necessary. This is also true when receiving emails from third-parties containing public keys. Contact your correspondent through some means of communication other than e-mail. You can use a telephone, text messages, Voice over Internet Protocol (VoIP) or any other method, but you must be absolutely certain that you are really talking to the right person. As a result, telephone conversations and face-to-face meetings work best, if they are convenient and if they can be arranged safely.
Sending your public key is easy.
In Thunderbird, click on the  icon.
icon.
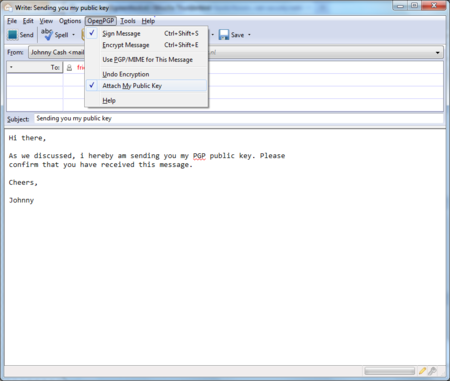
Compose a mail to your friend or colleague and tell them you are sending them your PGP public key. If your friend does not know what that means, you may have to explain them and point them to this documentation.
Before actually sending the mail, click to OpenPGP > Attach My Public Key option on the menu bar of the mail compose window. Next to this option a marked sign will appear. See the example below.
Daily GPG Usage
 button.
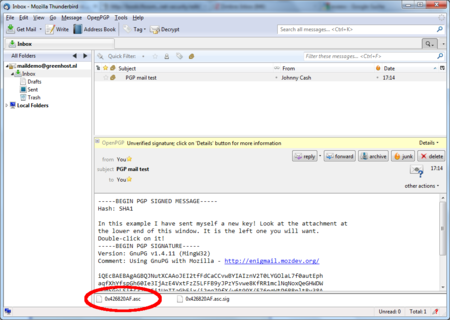
Lets say we receive a public key from a friend by mail. The key will show up in Thunderbird as an attached file. Scroll down the message and below you will find tabs with one or two file names. The extension of this public key file will be .asc, different from the extension of an attached GPG signature, which ends with .asc.sig
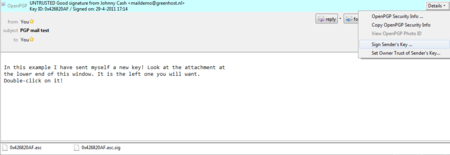
Look at the example email in the next image, which is a received, signed GPG message containing an attached public key. We notice a yellow bar with a warning message: ‘OpenPGP: Unverified signature, click on ’Details’ button for more information’. Thunderbird warns us that the sender is not known yet, which is correct. This will change once we have accepted the public key.
What are all those strange characters doing in the mail message? Because Thunderbird does not yet recognize the signature as valid, it prints out the entire raw signature, just as it has received it. This is how digitally signed GPG messages will appear to those recipients who do not have your public key.
The most important thing in this example is to find the attached GPG public key. We mentioned it is a file that ends with .asc. In this example it’s the first attachment on the left, in the red circle. Double-clicking on this attachment will make Thunderbird recognize the key.
Daily GPG Usage
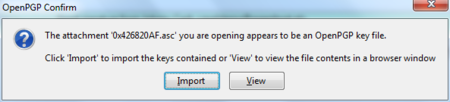
After we have clicked on the attachment, the following pop-up will appear.
Daily GPG Usage
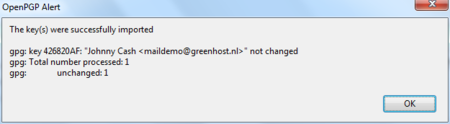
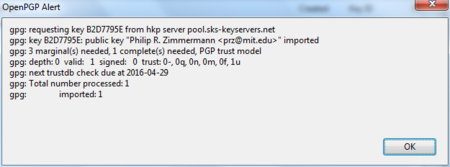
Thunderbird has recognized the GPG public key file. Click on ‘Import’ to add this key to your keyring. The following pop-up should appear. Thunderbird says the operation was successful. Click on ‘OK’ and you are almost done.
Daily GPG Usage
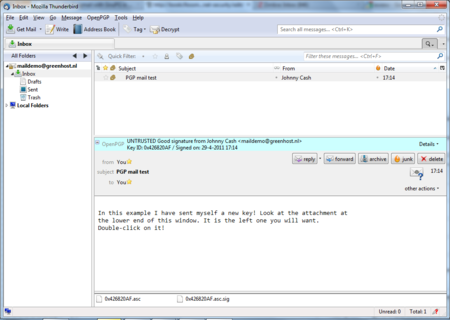
We are back in the main Thunderbird screen and we refresh the view on this particular example message, by clicking on some other message and back for example. Now the body of the message looks different (see below). This time Thunderbird does recognize the signature, because we have added the public key of the sender.
Daily GPG Usage
There is still one thing that remains. While Thunderbird now recognizes the signature, we should explicitly trust that the public key really belongs to the sender in real life. We realize this when we take a closer look at the green bar (see below). While the signature is good, it is still UNTRUSTED.

Daily GPG Usage
We will now decide to trust this particular public key and the signatures made by it. We can do this immediately by clicking on ‘Details’. A small menu will appear (see below). From this menu we should click on the option ‘Sign Sender’s Key …’.
Daily GPG Usage
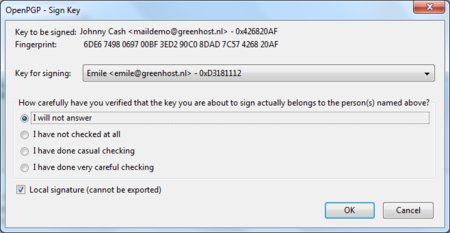
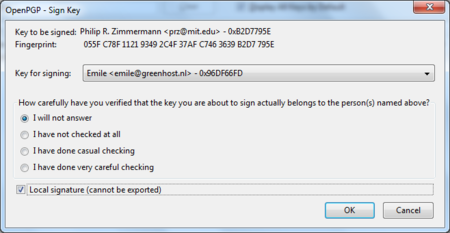
After we have selected ‘Sign Sender’s Key …’ we will get another selection window (see below). We are requested to state how carefully we have checked this key for validity. The explanation of levels of trust and trust networks in GPG falls outside the scope of this document. We will not use this information, therefore we will just select the option ‘I will not answer’. Also select the option ‘Local signature (cannot be exported)’. Click on the ‘OK’ button to finishing signing this key. This finishes accepting the public key. You can now send encrypted mail to this individual.
Daily GPG Usage
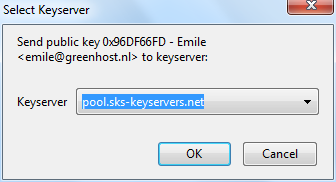
Another method of distributing public keys is by putting them on a public key server. This allows anyone to check whether your email address has GPG support, and then download your public key.
To put your own key on a keyserver, take the following steps.
OpenPGP > Key Management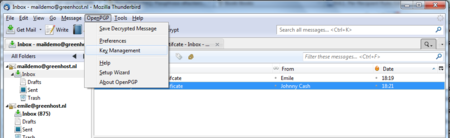
Daily GPG Usage
Daily GPG Usage

Daily GPG Usage
Daily GPG Usage
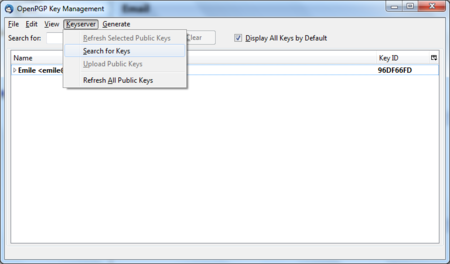
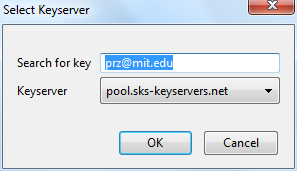
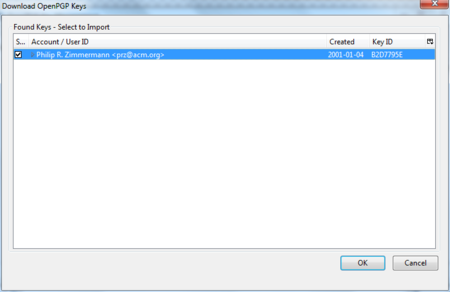
To look up whether some email address has a public key available on a server, take the following steps.
Head to the key manager by using the Thunderbird menu and click on OpenPGP > Key Management
In the key manager window menu bar, select Keyserver > Search for Keys
Daily GPG Usage
Daily GPG Usage
Daily GPG Usage
Daily GPG Usage

Daily GPG Usage
Daily GPG Usage
Digitally signing email messages is a way to prove to recipients that you are the actual sender of a mail message. Those recipients who have received your public key will be able to verify that your message is authentic.
Offer your friend your public key, using the method described earlier in this chapter.
In Thunderbird, click on the icon.
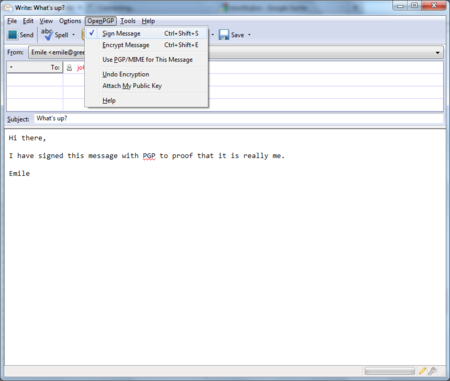
Before actually sending the mail, enable the OpenPGP > Sign Message option via the menu bar of the mail compose window, if it is not enable already. Once you have enabled this option, by clicking on it, a marked sign will appear. Clicking again should disable encryption again. See the example below.
Daily GPG Usage
button and your signed mail will be sent.You should have received the public key from the friend or colleague you want to email and you should have accepted their public key, using the method describe earlier in this chapter.
In Thunderbird, click on the icon.
Compose a mail to the friend or colleague, from who you have previously received their public key. Remember the subject line of the message will not be encrypted, only the message body itself, and any attachments.
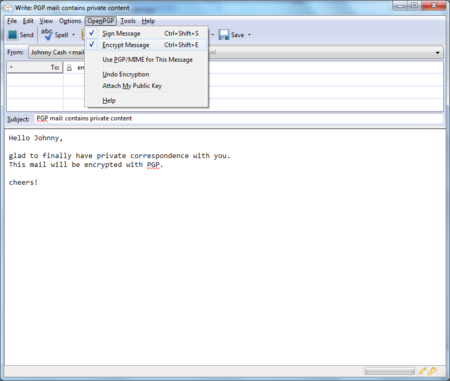
Before actually sending the mail, enable the OpenPGP > Encrypt Message option via the menu bar of the mail compose window, if it is not enabled already. Once you have enabled this option, by clicking on it, a marked sign will appear. Clicking again should disable encryption again. See the example below.
Daily GPG Usage
button and your encrypted mail will be sent.You will often want to make sure all your messages to a certain colleague or friend are signed and encrypted. This is good practice, because you may forget to enable the encryption manually. You can do this by editing the per-recipient rules. To do this we access the OpenPGP per-recipient rule editor.
Select OpenPGP > Preferences from the Thunderbird menu bar.
Daily GPG Usage
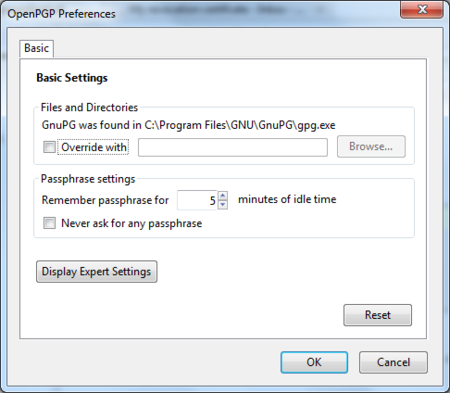
The preferences window will appear like below. We need to click on ‘Display Expert Settings’.
Daily GPG Usage
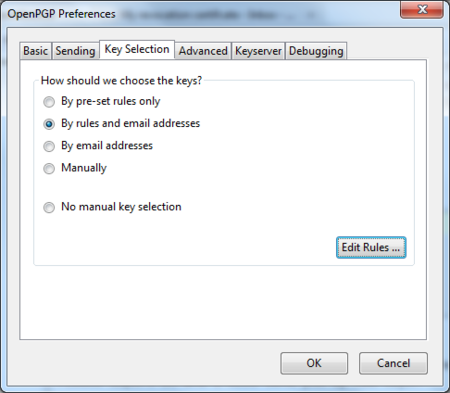
New menu tabs will appear in the window. Go to the tab ‘Key Selection’ and then click on the button labeled ‘Edit Rules …’
Daily GPG Usage
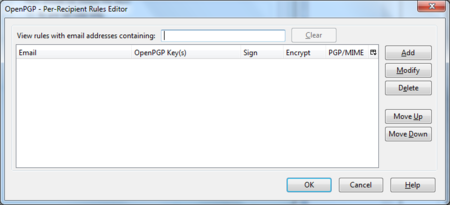
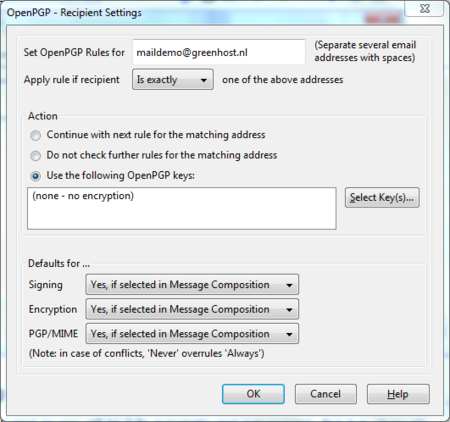
We are now shown the per-recipient rules editor (see below). This editor can be used to specify the way how messages to certain recipients are sent. We will now add a rule saying we want to encrypt and sign all mail messages to maildemo@greenhost.nl
First click on the ‘Add’ button.
Daily GPG Usage
Now the window to add a new rule will be shown.
The first thing we should enter is the email address of the recipient. In the example below we have entered maildemo@greenhost.nl
Daily GPG Usage
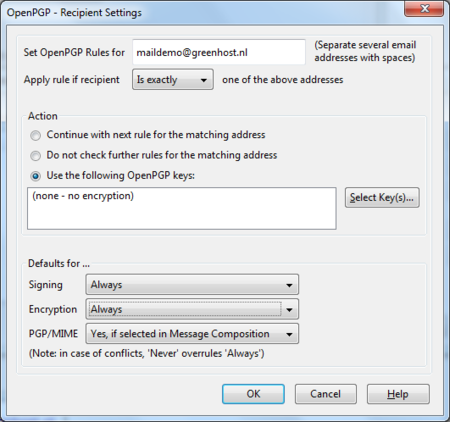
Now we will set the encryption defaults by using the drop-downs below. For Signing select ‘Always’. For Encryption also select ‘Always’.
Daily GPG Usage
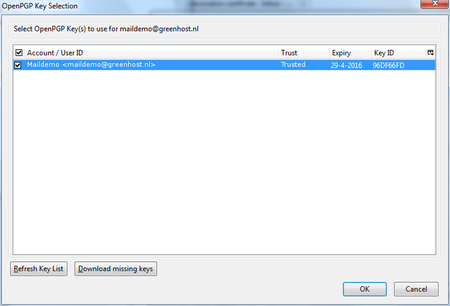
Finally we have to select the public key of the recipient, with which to encrypt our messages. Do not forget this important step, otherwise the e-mail will not be encrypted. Click on the button labeled ‘Select Key(s)…’. The key selection window will show up. The most obvious key will be selected by default. In the example below, we only have one public key available. We can select keys by clicking on the small box next to the address. Then we click ‘OK’ and close all relevant windows and we are finished.
Daily GPG Usage
Decrypting email messages sent to you will be fully automatic and transparent. But it is obviously important to see whether or not a message to you has in fact been encrypted or signed. This information is available by looking at the special bar above the message body.
A valid signature will be recognized by a green bar above the mail message like the example image below.

Daily GPG Usage
The last example message was signed but not encrypted. If the message had been encrypted, it would show like this:

Daily GPG Usage
When a message which has been encrypted, but not signed, it could have been a forgery by someone. The status bar will become gray like in the image below and tells you that while the message was sent securely (encrypted), the sender could have been someone else than the person behind the email address you will see in the ‘From’ header. The signature is neccessaty to verify the real sender of the message. Of course it is perfectly possible that you have published your public key on the Internet and you allow people to send you emails anonymously. But is it also possible that someone is trying to impersonate one of your friends.

Daily GPG Usage
Similarly if you receive a signed email from somebody you know, and you have this persons public key, but still the status bar becomes yellow and displays a warning message, it is likely that someone is attempting to send you forged emails!

Daily GPG Usage
Sometimes secret keys get stolen or lost. The owner of the key will inform his friends and send them a so-called revocation certificate (more explanation of this in the next paragraph). Revocation means that we no longer trust the old key. The thief may afterwards still try his luck and send you a falsely signed mail message. The status bar will now look like this:

Daily GPG Usage
Strangely enough Thunderbird in this situation will still display a green status bar! It is important to look at the contents of the status bar in order to understand the encryption aspects of a message. GPG allows for strong security and privacy, but only if you are familiar with its use and concepts. Pay attention to warnings in the status bar.
Your secret key has been stolen by somebody. Your harddisk crashed and you have lost all your data. If your key is lost, you can no longer decrypt messages. If your key has been stolen, somebody else can decrypt your communication. You need to make a new set of keys. The process of creating keys, using the OpenPGP wizard in Thunderbird, has been described in this manual. But first you want to tell the world that your old public key is now worthless, or even dangerous to use.
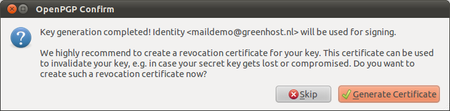
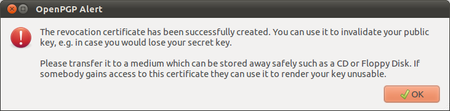
During the creation of your key-pair, the OpenPGP wizard offered you the possibility to create a so-called revocation certificate. This is a special file you send to others in the advent you have to disable your key. If you have a copy of this file, sending the revocation key is simply sending the file as an attachment to all your friends. You can no longer send signed mails (obviously, because you have lost your secret key). That doesn’t matter. Send it as a normal mail. The revocation certificate file could only have been created by the owner of the secret key and proves he or she wants to revoke it. That’s why it should normally be kept hidden from others.
If you do not have the revocation certificate, there exists no other option than for you to contact your friends personally and convince them your key is lost and that they should no longer trust it.
If you have reason to believe your secret key has been compromised, or worse your secret key and passphrase, it is very important to contact others that they should stop sending you encrypted messages. With your secret key, other persons will be able to break the encryption of your e-mail messages if they also have your passphrase. This is also true for those messages you have send in the past. Cracking the passphrase is not trivial, but it may be possible if the party has lots of resources, like a state or a big organization for example, or if your passphrase is too weak. In any case you should assume the worst and assume your passphrase may have been compromised. Send a revocation certificate file to all your friends or contact them personally and inform them of the situation.
Even after you have revoked your old key pair, the stolen key may still be used to decrypt your previous correspondence. You should consider other ways to protect that old correspondence, for instance by re-encrypting it with a new key. The latter operation will not be discussed in this manual. If you are uncertain you should seek assistance from experts or look up more information on the web.
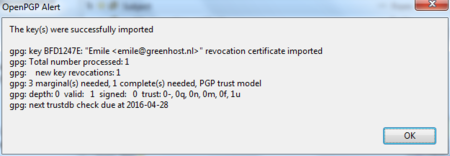
If one of your friends sends you a revocation certificate, s/he asks you to distrust his public key from now on. You should always accept such a request and ‘import’ the certificate to disable their key. The process of accepting a revocation certificate is exactly the same as accepting a public key, as has already been described in the chapter. Thunderbird will ask you if you want to import the ‘OpenPGP key file’. Once you have done so, a confirmation pop-up should be displayed like below.
Daily GPG Usage
Your keys are usually stored on your hard disk as normal files. They may get lost if your computer gets damaged. It is strongly advised to keep a backup of your keys in a safe place, like a vault. Making a a backup of your secret key has another security advantage as well. Whenever you fear your laptop or computer is in immediate danger of being confiscated, you can safely delete your key-pair. Your email will be rendered unreadable immediately. At a later stage, you can retrieve your keys from the vault and re-import them in Thunderbird.
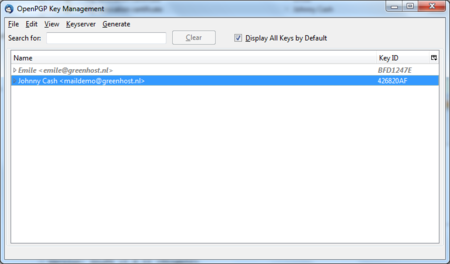
To make a backup of your key-pair, first head to the key manager by using the Thunderbird menu and click on OpenPGP > Key Management.
You need to have selected the ‘Display All Keys by Default’ option to get a list of all your keys. Lookup your own email address in the list and right click on the address. A selection window will appear with some options. Select the option ‘Export Keys to File’.
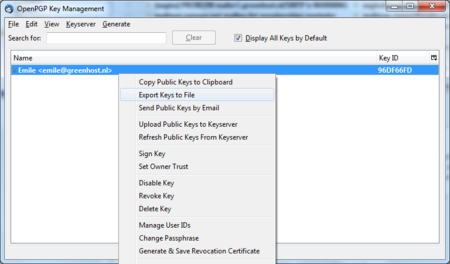
Daily GPG Usage
Now we will save the key-pair to a file. Thunderbird asks us if we want to include the secret key as well. We do want to include the secret key, therefore we select ‘Export Secret Keys’.

Daily GPG Usage
Finally Thunderbird asks us for the location of the key file. You can store the file anywhere you like, network disk, USB-stick. Just remember to hide it away from other people.
More documentation on using GPG with Thunderbird can be found on the website of the Enigmail plugin. The Enigmail handbook is the guide you will want to use.
http://enigmail.mozdev.org/documentation/handbook.php.html
The only safe way of encrypting email inside of the browser window is to encypt it outside and then copy & paste the encrypted text into the browser window.
For example, write the text in a text editor like gedit, vim or kate and save it as .txt file (in this example “message.txt”. Then type
gpg -ase -r <recipients email/gpg id> -r <your gpg id> message.txtA new file called “message.asc” will be created. It contains the encrypted message and can thus be either attached to an email or its content safely copy & pasted into the browser window.
To decrypt a message from the browser window, simply type gpg into the command line and hit Enter. Then copy & paste the message to be decrpyted into the commandline window and after being asked for your passphrase hit Ctrl+D (this enters a end-of-file character and prompts gpg to output the cleartext message).
If using the commandline seems too cumbersome to you, you might consider installing a helper application like gpgApplet, kgpg or whatever application ships with your operating system.
the CryptoParty handbook - Version: 2013-08-21 - Back to Index