Firefox on Ubuntu
the CryptoParty handbook - Version: 2013-08-21 - Back to Index
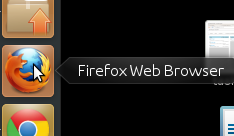
Firefox is already installed on Ubuntu by default. To open it, click on the Unity side bar where you see the Firefox icon:
Firefox on Ubuntu
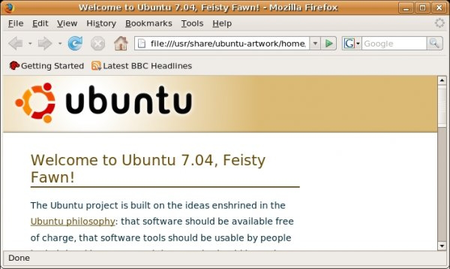
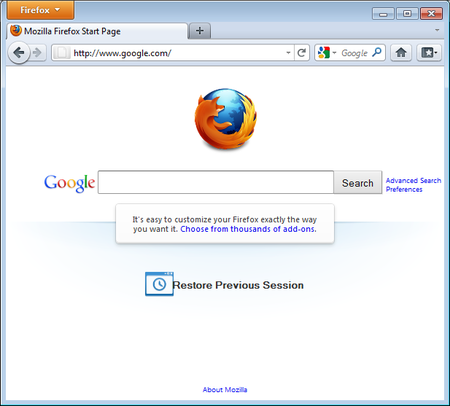
Firefox starts and a welcome window opens:
Firefox on Ubuntu
Mac OS X Firefox Install
Mac OS X Firefox Install
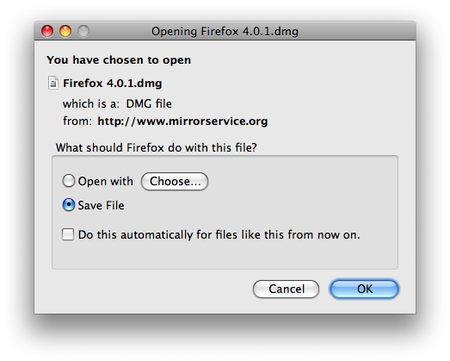
Once the download is complete a window similar to this appears:
Mac OS X Firefox Install
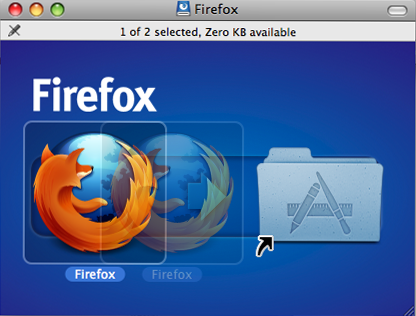
Click and drag the Firefox icon on top of the Applications icon.
File > Eject Firefox.Now, open the Applications directory and drag the Firefox icon to the dock:

Mac OS X Firefox Install
Mac OS X Firefox Install
Congratulations, you are now ready to use Firefox!
Mac OS X Firefox Install

Windows Firefox Install
Click the download button and the installation file will begin to download to your computer.
Once the download is complete, double-click the installation file to start the Firefox installation wizard.
A welcome screen appears.
Click Next to continue. You will be asked if you would like the standard installation, or whether you would like to customize it. Choose the standard installation and click Next.

Windows Firefox Install
Windows Firefox Install
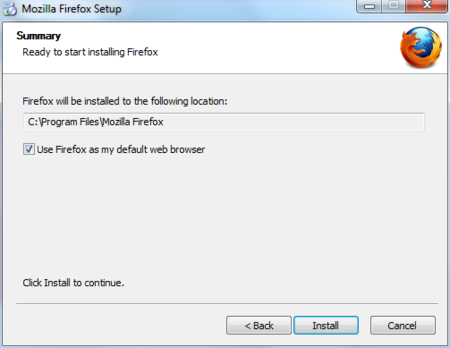
Click Install.
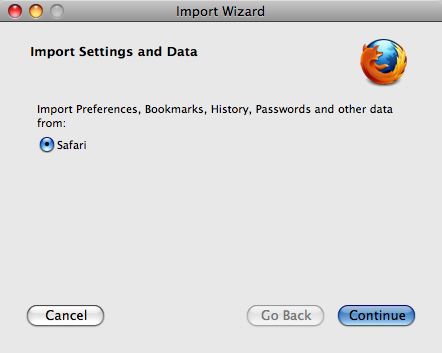
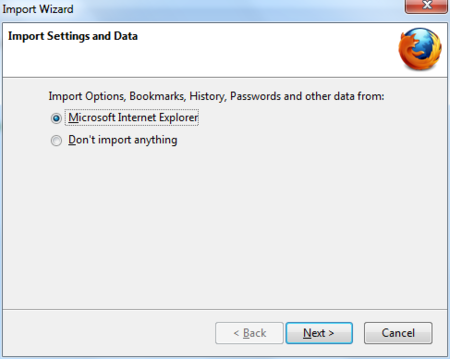
To import your bookmarks and other data from other browsers (for example Internet Explorer), click Continue. If you don’t want to import anything, just select Cancel.
Windows Firefox Install
If the Launch Firefox now check box is checked, Firefox will start after you click Finish. Otherwise you can launch Firefox through the start menu.
If at any time throughout the installation process you are prompted with a User Account Control (UAC) window, press Continue, Allow, or Accept.
If you have problems starting Firefox, see https://support.mozilla.com/kb/Firefox+will+not+start
When you first download and install Firefox, it can handle basic browser tasks immediately. You can also add extra capabilities or change the way Firefox behaves by installing add-ons, small additions that extend Firefox’s power.
Firefox extensions can pimp your browser, but they can also collect and transmit information about you. Before you install any add-on, keep in mind to choose add-ons from trusted sources. Otherwise, an add-on might share information about you without your knowing, keep a record on the sites you have visited, or even harm your computer.
There are several kinds of add-ons:
For the topics covered in this book we are only going to need extensions. We will look at some add-ons that are particularly relevant for dealing with Internet security. The variety of available extensions is enormous. You can add dictionaries for different languages, track the weather in other countries, get suggestions for Web sites that are similar to the one you are currently viewing, and much more. Firefox keeps a list of current extensions on its site (https://addons.mozilla.org/firefox), or you can browse them by category at https://addons.mozilla.org/firefox/browse.
Caution: We recommend that you never install an add-on for Firefox unless it is available from the Firefox add-on pages. You should also never install Firefox unless you get the installation files from a trusted source. It is important to note that using Firefox on someone else’s computer or in an Internet caf increases your potential vulnerability. Know that you can take Firefox on a CD or USB-stick (check our chapter on that issue).
While no tool can protect you completely against all threats to your online privacy and security, the Firefox extensions described in this chapter can significantly reduce your exposure to the most common ones, and increase your chances of remaining anonymous.
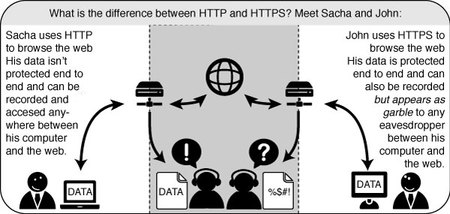
HTTP is considered unsafe, because communication is transmitted in plain text. Many sites on the Web offer some support for encryption over HTTPS, but make it difficult to use. For instance, they may connect you to HTTP by default, even when HTTPS is available, or they may fill encrypted pages with links that go back to the unencrypted site. The HTTPS Everywhere extension fixes these problems by rewriting all requests to these sites to HTTPS. Although the extension is called “HTTPS Everywhere”, it only activates HTTPS on a particular list of sites and can only use HTTPS on sites that have chosen to support it. It cannot make your connection to a site secure if that site does not offer HTTPS as an option.
HTTPS Schema
Please note that some of those sites still include a lot of content, such as images or icons, from third party domains that is not available over HTTPS. As always, if the browser’s lock icon is broken or carries an exclamation mark, you may remain vulnerable to some adversaries that use active attacks or traffic analysis. However, the effort required to monitor your browsing should still be usefully increased.
Some Web sites (such as Gmail) provide HTTPS support automatically, but using HTTPS Everywhere will also protect you from TLS/SSL-stripping attacks, in which an attacker hides the HTTPS version of the site from your computer if you initially try to access the HTTP version.
Additional information can be found at: https://www.eff.org/https-everywhere.
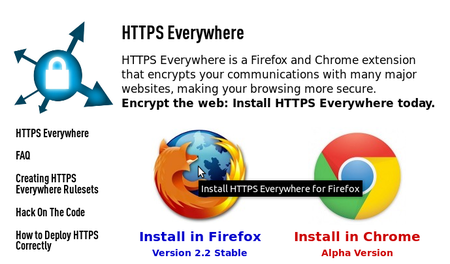
First, download the HTTPS Everywhere extension from the official Web site: https://www.eff.org/https-everywhere
HTTPS Everywhere
Select the newest release. In the example below, version 2.2 of HTTPS Everywhere was used. (A newer version may be available now.)
HTTPS Everywhere
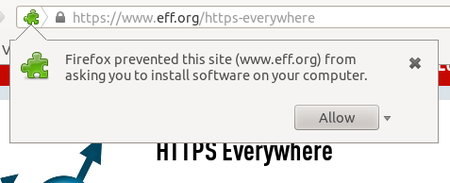
Click on “Allow”. You will then have to restart Firefox by clicking on the “Restart Now” button. HTTPS Everywhere is now installed.
To access the HTTPS Everywhere settings panel in Firefox 4 (Linux), click on the Tools menu at the top of your screen and then select Add-ons. (Note that in different versions of Firefox and different operating systems, the Add-ons Manager may be located in different places in the interface.)

HTTPS Everywhere
Click on the Preferences button.
HTTPS Everywhere
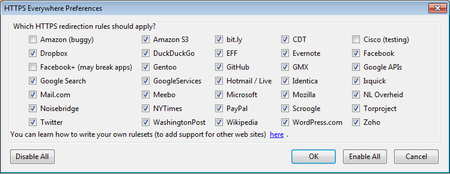
A list of all supported Web sites where HTTPS redirection rules should be applied will be displayed. If you have problems with a specific redirection rule, you can uncheck it here. In that case, HTTPS Everywhere will no longer modify your connections to that specific site.
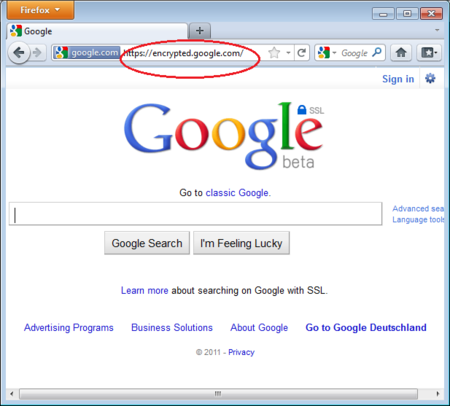
Once enabled and configured, HTTPS Everywhere is very easy and transparent to use. Type an insecure HTTP URL (for example, http://www.google.com).
HTTPS Everywhere
Press Enter. You will be automatically redirected to the secure HTTPS encrypted Web site (in this example: https://encrypted.google.com). No other action is needed.
HTTPS Everywhere
Your network operator may decide to block the secure versions of Web sites in order to increase its ability to spy on what you do. In such cases, HTTPS Everywhere could prevent you from using these sites because it forces your browser to use only the secure version of these sites, never the insecure version. (For example, we heard about an airport WiFi network where all HTTP connections were permitted, but not HTTPS connections. Perhaps the WiFi operators were interested in watching what users did. At that airport, users with HTTPS Everywhere were not able to use certain Web sites unless they temporarily disabled HTTPS Everywhere.)
In this scenario, you might choose to use HTTPS Everywhere together with a circumvention technology such as Tor or a VPN in order to bypass the network’s blocking of secure access to Web sites.
You can add your own rules to the HTTPS Everywhere add-on for your favorite Web sites. You can find out how to do that at: https://www.eff.org/https-everywhere/rulesets. The benefit of adding rules is that they teach HTTPS Everywhere how to ensure that your access to these sites is secure. But remember: HTTPS Everywhere does not allow you to access sites securely unless the site operators have already chosen to make their sites available through HTTPS. If a site does not support HTTPS, there is no benefit to adding a ruleset for it.
If you are managing a Web site and have made an HTTPS version of the site available, a good practice would be to submit your Web site to the official HTTPS Everywhere release.
Adblock Plus (http://www.adblockplus.org) is mainly known for blocking advertisements on websites. But it also can be used to block other content that may try to track you. To keep current with the latest threats, Adblock Plus relies on blacklists maintained by volunteers.
Extra Geek info: How does Adblock Plus block addresses?
The hard work here is actually done by Gecko, the engine on top of which Firefox, Thunderbird and other applications are built. It allows something called “content policies”. A content policy is simply a JavaScript (or C++) object that gets called whenever the browser needs to load something. It can then look at the address that should be loaded and some other data and decide whether it should be allowed. There is a number of built-in content policies (when you define which sites shouldn’t be allowed to load images in Firefox or SeaMonkey, you are actually configuring one of these built-in content policies) and any extension can register one. So all that Adblock Plus has to do is to register its content policy, other than that there is only application logic to decide which addresses to block and user interface code to allow configuration of filters.
Once you have Firefox installed:
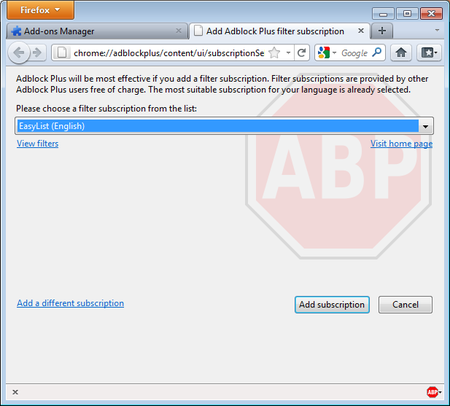
Adblock Plus by itself doesn’t do anything. It can see each element that a Web site attempts to load, but it doesn’t know which ones should be blocked. This is what Adblock’s filters are for. After restarting Firefox, you will be asked to choose a filter subscription (free).
Ad Block Plus
Which filter subscription should you choose? Adblock Plus offers a few in its dropdown menu and you may wish to learn about the strengths of each. A good filter to start protecting your privacy is EasyList (also available at http://easylist.adblockplus.org/en).
As tempting as it may seem, don’t add as many subscriptions as you can get, since some may overlap, resulting in unexpected outcomes. EasyList (mainly targeted at English-language sites) works well with other EasyList extensions (such as region-specific lists like RuAdList or thematic lists like EasyPrivacy). But it collides with Fanboy’s List (another list with main focus on English-language sites).
You can always change your filter subscriptions at any time within preferences. Once you’ve made your changes, click OK.
AdBlock Plus also lets you create your own filters, if you are so inclined. To add a filter, start with Adblock Plus preferences and click on “Add Filter” at the bottom left corner of the window. Personalized filters may not replace the benefits of well-maintained blacklists like EasyList, but they’re very useful for blocking specific content that isn’t covered in the public lists. For example, if you wanted to prevent interaction with Facebook from other Web sites, you could add the following filter:
||facebook.*$domain=~facebook.com|~127.0.0.1The first part (||facebook.*) will initially block everything coming from Facebook’s domain. The second part ($domain=~facebook.com|~127.0.0.1) is an exception that tells the filter to allow Facebook requests only when you are in Facebook or if the Facebook requests come from 127.0.0.1 (your own computer) in order to keep certain features of Facebook working.
A guide on how to create your own Adblock Plus filters can be found at http://adblockplus.org/en/filters.
You can see the elements identified by AdBlock Plus by clicking on the ABP icon AdBlock Plus icon in your browser (usually next to the search bar) and selecting “Open blockable items”. A window at the bottom of your browser will let you enable or disable each element on a case-by-case basis. Alternatively, you can disable AdBlock Plus for a specific domain or page by clicking on the ABP icon and ticking the option “Disable on [domain name]” or “Disable on this page only”.
Below is a short list of extensions that are not covered in this book but are helpful to further protect you.
Flagfox - puts a flag in the location bar telling you where the server you are visiting is most probably located. https://addons.mozilla.org/en-US/firefox/addon/flagfox/
BetterPrivacy - manages “cookies” used to track you while visiting websites. Cookies are small bits of information stored in your browser. Some of them are used to track the sites you are visiting by advertisers. https://addons.mozilla.org/en-US/firefox/addon/betterprivacy/
GoogleSharing - If you are worried that google knows your search history, this extension will help prevent that. https://addons.mozilla.org/en-us/firefox/addon/googlesharing/
A proxy server allows you to reach a Web site or other Internet location even when direct access is blocked in your country or by your ISP. There are many different kinds of proxies, including:
http://proxy.com/cgi-bin/nph-proxy.cgiproxy.example.com:3128 or 192.168.0.1:8080.You can use a Web proxy directly without any configuration by typing in the URL. The HTTP and SOCKS proxies, however, have to be configured in your Web browser.
In Firefox you can change the settings for using a proxy. You’ll need to open the Options or Preferences window of Firefox. You can find this in the menu, by clicking on the top of the Window and selecting Edit > Preferences on Linux or Tools > Options on Windows.
Go to the Network section and open the Advanced tab.
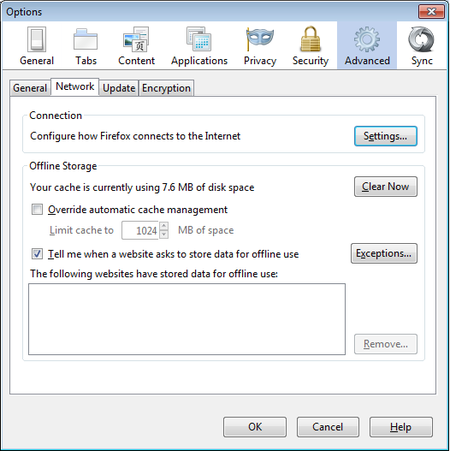
Firefox Proxy Settings
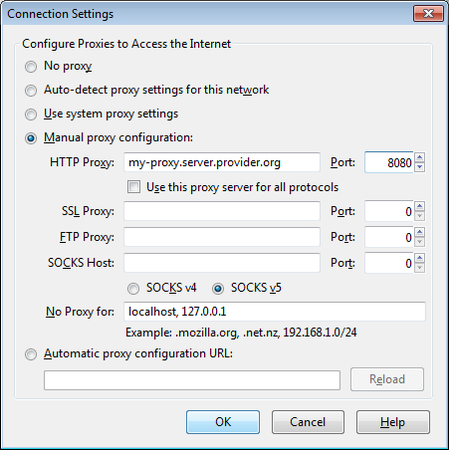
Select Settings, click on “Manual proxy configuration” and enter the information of the proxy server you want to use. Please remember that HTTP proxies and SOCKS proxies work differently and have to be entered in the corresponding fields. If there is a colon (:) in your proxy information, that is the separator between the proxy address and the port number. Your screen should look like this:
Firefox Proxy Settings
After you click OK, your configuration will be saved and your Web browser will automatically connect through that proxy on all future connections. If you get an error message such as, “The proxy server is refusing connections” or “Unable to find the proxy server”, there is a problem with your proxy configuration. In that case, repeat the steps above and select “No proxy” in the last screen to deactivate the proxy.
Tor is a system intended to enable online anonymity, composed of client software and a network of servers which can hide information about users’ locations and other factors which might identify them. Imagine a message being wrapped in several layers of protection: every server needs to take off one layer, thereby immediately deleting the sender information of the previous server.
Use of this system makes it more difficult to trace internet traffic to the user, including visits to Web sites, online posts, instant messages, and other communication forms. It is intended to protect users’ personal freedom, privacy, and ability to conduct confidential business, by keeping their internet activities from being monitored. The software is open-source and the network is free of charge to use.
Like all current low latency anonymity networks, Tor cannot and does not attempt to protect against monitoring of traffic at the boundaries of the Tor network, i.e., the traffic entering and exiting the network. While Tor does provide protection against traffic analysis, it cannot prevent traffic confirmation (also called end-to-end correlation)
Caution: As Tor does not, and by design cannot, encrypt the traffic between an exit node and the target server, any exit node is in a position to capture any traffic passing through it which does not use end-to-end encryption such as TLS. (If your postman is corrupt he might still open the envelope and read the content). While this may or may not inherently violate the anonymity of the source, if users mistake Tor’s anonymity for end-to-end encryption they may be subject to additional risk of data interception by third parties. So: the location of the user remains hidden; however, in some cases content is vulnerable for analysis through which also information about the user may be gained.
The Tor Browser Bundle lets you use Tor on Windows, OSX and/or Linux without requiring you to configure a Web browser. Even better, it’s also a portable application that can be run from a USB flash drive, allowing you to carry it to any PC without installing it on each computer’s hard drive.
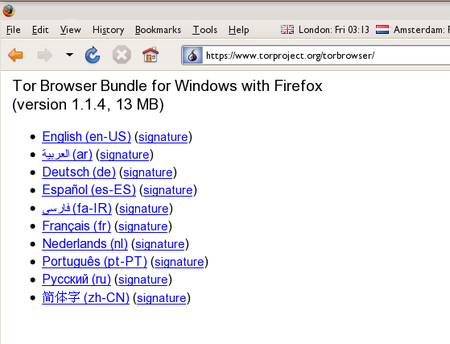
You can download the Tor Browser Bundle from the torproject.org Web site (https://www.torproject.org), either as a single file (13MB) or a split version that is multiple files of 1.4 MB each which may proof easier to download on slow connections.
If the torproject.org Web site is filtered from where you are, type “tor mirrors” in your favorite Web search engine: The results probably include some alternative addresses to download the Tor Browser Bundle.
Caution: When you download Tor Bundle (plain or split versions), you should check the signatures of the files, especially if you are downloading the files from a mirror site. This step ensures that the files have not been tampered with. To learn more about signature files and how to check them, read https://www.torproject.org/docs/verifying-signatures
(You can also download the GnuPG software that you will need to check the signature here: http://www.gnupg.org/download/index.en.html#auto-ref-2)
The instructions below refer to installing Tor Browser on Microsoft Windows. If you are using a different operating system, refer to the torproject.org website for download links and instructions.
Tor
Click the link for your language to download the installation file.
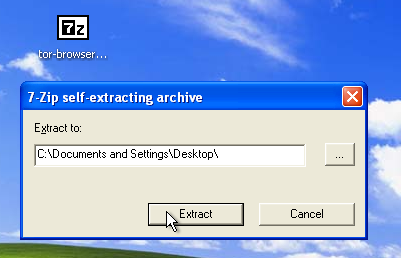
On windows double-click the .EXE file you just downloaded. A “7-Zip self-extracting archive” window appears.
Tor
Note: You can choose to extract the files directly onto a USB key or memory stick if you want to use Tor Browser on different computers (for instance on public computers in Internet cafes).
Tor
Tor
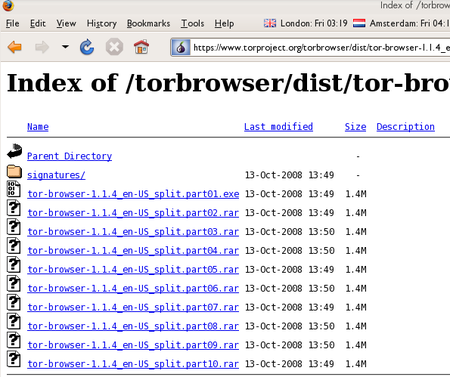
Click each file to download it (one ending in “.exe” and nine others ending in “.rar”), one after the other, and save them all in one folder on your hard- or USB-drive.
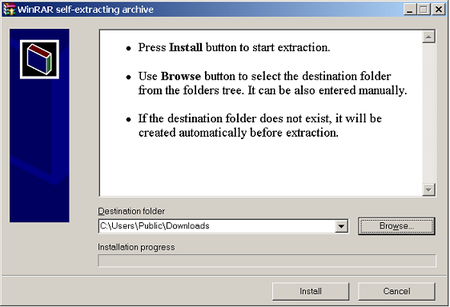
Double-click the first part (the file whose name ends in “.exe”). This runs a program to gather all the parts together.
Tor
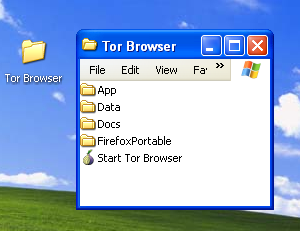
Choose a folder where you want to install the files, and click “Install”. The program displays messages about its progress while it’s running, and then quits.
When the extraction is completed, open the folder and check that the contents match the image below:

Tor
Before you start:
Close Firefox. If Firefox is installed on your computer, make sure it is not currently running.
Close Tor. If Tor is already installed on your computer, make sure it is not currently running.
Launch Tor Browser:
Tor

Tor

Tor
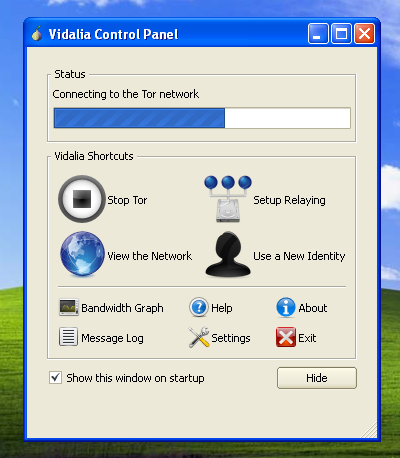
Try viewing a few Web sites, and see whether they display. The sites are likely to load more slowly than usual because your connection is being routed through several relays.
If the onion in the Vidalia Control Panel never turns green or if Firefox opened, but displayed a page saying “Sorry. You are not using Tor”, as in the image below, then you are not using Tor.
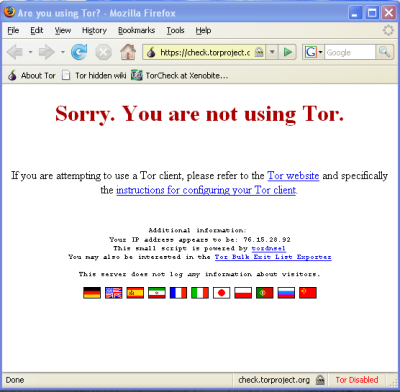
Tor
If you see this message, close Firefox and Tor Browser and then repeat the steps above. You can perform this check to ensure that you are using tor, at any time by clicking the bookmark button labelled “TorCheck at Xenobite…” in the Firefox toolbar.
If Firefox browser does not launch, another instance of the browser may be interfering with Tor Browser. To fix this:
If Tor Browser still doesn’t work after two or three tries, Tor may be partly blocked by your ISP and you should try using the bridge feature of Tor.
Chrome is Google’s browser. Here are some useful tips and extensions:
Chrome can search as you type. The advantage of this is that you get search suggestions and can use Google’s predictions - but the disadvantage is that every character you type is sent to Google’s servers, where it may be logged.
To disable, open Chrome’s settings by clicking the menu button at the right of the address bar and clicking Settings. Or, simply type chrome://settings/ in your address bar.
Ensure that the Enable Instant for faster searching (omnibox input may be logged) checkbox is unchecked.
Just like Firefox, AdBlock removes ads. Install from this Chrome Webstore page.
Forces encrypted https connections wherever possible. Installation link can be found on the EFF HTTPS Everywhere homepage.
PrivacyFix (beta) gives you a dashboard view of your privacy settings on Facebook and Google, as well as Do-Not-Track headers and tracking cookies. It provides links to quickly change these privacy settings without digging through many drilldown pages. Install from the Chrome web store page
the CryptoParty handbook - Version: 2013-08-21 - Back to Index